Subscribe: Follow Me on Pinterest

Ads 468x60px

Saturday, December 31, 2011

Baking Adventure: The Hunger Games - District 11 Bread

Happy New Year's Eve! For my final post of 2011, I thought it would be appropriate to dedicate it to the book series I recently got hooked on - The Hunger Games! Food plays such a prominent role in the books. Bread, specifically, has an important role with a specific type of bread representing each of the 13 districts. Katniss described District 11's bread as "made of dark ration grain and shaped in a crescent. Sprinkled with seeds." Today, I bring to you my rendition of District 11's bread.
The Hunger Games: District 11 Bread
THE HUNGER GAMES: DISTRICT 11 BREAD
Inspired by Hand-Kneaded Whole Wheat Bread from Cook's Illustrated
Yield: about 14 crescents

Ingredients
  • 2 1/3  cups water (warmed to 120 degrees F)
  • 1 package of yeast (or 2 1/4 tsp)
  • 1/4  cup molasses
  • 3 tablespoons vegetable oil
  • 2 1/2 teaspoons table salt
  • 2 tablespoons ground flax seed
  • 1/2 cup old fashioned oatmeal
  • 3 cups wheat flour
  • 2 3/4  cups all-purpose flour
  • 1/4 cup sunflower seeds (plus more to sprinkle on top)
  • 1  tablespoon sesame (plus more to sprinkle on top)
  • 1 egg (beaten for egg wash)
Directions
  1. Mix water, yeast, molasses, oil, salt, ground flax seed, and oatmeal in a large mixing bowl.
  2. Mix 2 3/4 cup of wheat flour with the all purpose flour in a separate bowl. Reserve 1/4 cup of wheat flour for dusting later.
  3. Add 3 1/2 cups of the flour mixture to the wet ingredients. Beat with a wooden spoon for 5 minutes.
  4. Mix and knead in the remaining flour mixture until the dough becomes soft and elastic.
  5. Place dough in a lightly greased bowl. Cover with plastic wrap and let rise until double in volume (about 1 hour).
  6. Heat oven to 375 degrees F.
  7. Punch down dough.
  8. Divide dough into 4-ounce pieces.
  9. Form each piece into a triangle and roll into a crescent shape. Start from the wide end of the triangle and roll toward the tip.
  10. Cover the crescents with plastic wrap and let rise until almost double in size (about 20 minutes).
  11. Coat the crescents with egg wash and sprinkle with sunflower and sesame seeds.
  12. Bake for 20 minutes or until golden brown, rotating baking pan half way through.
The Hunger Games: District 11 Bread
The crescents came out dense and chewy - almost bagel-like. The oatmeal, ground flax seed, and wheat flour probably contributed to that. It was tasty though and very filling. I imagine it would be great sustenance for the citizens working in the fields of District 11.

I know The Unofficial Hunger Games Cookbook recently came out and I can't wait to get my hands on it to try the unofficial District 11 bread (amongst other recipes), but for now, I'm content with my rendition. As the new year approaches, may the odds ever be in you favor. ^_~

Update (2/10/2012):  You may also be interested in my rendition of District 4 Bread.

Friday, December 30, 2011

Anime Food Re-creation: Yumeiro Patissiere's Decorated Cookies

Hello all! I have another Anime Food Re-creation here. In the same episode that Ichigo creates an apple birthday cake for Ringo in Yumeiro Patissiere, she also has a tray of decorated sugar and gingerbread cookies.
Yumeiro Patissiere Decorated Cookies
Ichigo ends up using these cookies to decorate the top of a gingerbread house when she has to redesign her cake. You can check out the Anime Food Re-creation of the gingerbread house by clicking here.

As for my tray of cookies, check these out!

Sunday, December 25, 2011

Baking Adventure: The Making of the Yumeiro Patissiere Gingerbread House

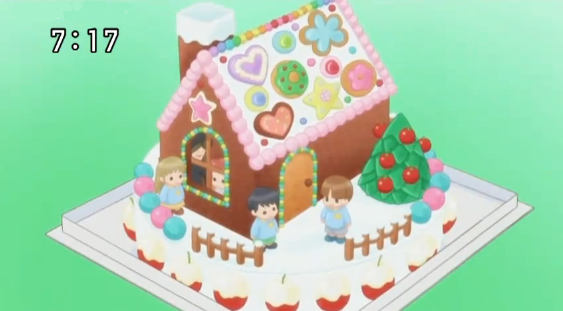
This Christmas, I really wanted to make a gingerbread house and was inspired by the one made by Ichigo in the anime Yumeiro Patissiere. Here's a breakdown of all the different features of the gingerbread house I made:
Yumeiro Patissiere's Gingerbread House for Ringo
House: The house itself was actually from a prebaked gingerbread house kit I got from Walmart. It didn't come with a chimney so I baked my own along with the cookies and "installed" that element.
Roof: The rainbow at the top of the roof was made with Sixlets, while the pink border was made with M&Ms. I covered the roof with icing (which was included in the gingerbread house kit) and attached the cookies and Sixlet accents.
Chimney: To get the snow on top of the chimney, I added milk to some of the icing to loosen it up. I then spooned it on top of the chimney and let it drip down. It's important to add the milk in tiny increments until you get the proper consistency. You don't want it to be too thick because it won't drip and you don't want it too loose because it will flow too much down the chimney. As a rough gauge, when you spoon and drop a drop of icing into the bowl, it should take about 8-10 seconds to "melt" back into the rest of the icing.
Yumeiro Patissiere Gingerbread House Roof and Door
Door: The door was made with a Biscoff cookie cut into the proper shape. I was going to use a graham cracker, but since the Biscoff cookies were open, I just used that to avoid opening another package of cookies. The doorknob was made with a chocolate chip (with the tip cut off for easier sticking) and the decorative border was made of little bits of Airheads that were rolled into balls. Airheads don't come in yellow, so I had to dye the white Airhead with some yellow food coloring. To make things easier, you can use yellow Starbursts or Laffy Taffy instead. I thought I still had some at home, but either someone ate them or they got thrown out so I had to improvise and make my own. You can also use nonpareils, but I only needed a few and didn't want to buy them. Not to mention, Airheads are a whole lot cheaper than nonpareils. :)
Yumeiro Patissiere Gingerbread Hose Window
Window: The window was made just like the door. I used pretzel rods to make the grid pattern.
White Chocolate Hello Kitty Figures
People: I don't have the skill or patience to make little fondant people so I used white chocolate and my Hello Kitty ice cube tray to make white chocolate figures. When they solidified, I used a toothpick to carefully cover the clothing area with icing. I then added some blue sanding sugar to add some color for the clothes. I also used melted chocolate to make the eyes.
Gingerbread Candy Christmas Tree
Tree: To make the tree, I first made a parchment paper cone and stuffed it with extra parchment paper to make it sturdier. I placed gingerbread around the cone and baked it with the rest of the cookies. To make the leaves, I flattened some green gumdrop stars and cut out diamond wedges. When the cookie was cool, I covered the tree with green icing and adhered the candy wedges. When that was hardened and dry, I added the red Sixlets for the apples.
Wooden Fence for Gingerbread House
Wooden Fence: To make the wooden fence, I stuck pretzel rods in a marshmallow base and used icing to adhere them all together.
Gumball Fence for Gingerbread House
Gumball Fence: The gumball fence was made with blue and pink gumballs on the same marshmallow base as the wooden fence.
Gumball Apples
Apple Border: The apple border was made with large red gumballs dipped in icing. To make them more stable and not roll around, I shaved off a little bit of the gumballs so there was a flat bottom surface. I stuck a toothpick through the gum part and then dipped them in the loosened icing and then added green Airhead stems before the icing dried.

So there you go! All the different elements of my Yumeiro Patissiere gingerbread house. It took me several days to complete and cost about $30 to make with all the different candies. Pretty crazy... kinda stressful... but loads of fun! I hope everyone has an Extraordinary Merry Christmas!

Anime Food Re-creation: Yumeiro Patissiere's Gingerbread House for Ringo

Merry Christmas, everyone! I hope you guys are all having a wonder holiday season! In the spirit of the holiday, I'm posting my re-creation of Yumeiro Patissiere's gingerbread house!
Yumeiro Patissiere's Gingerbread House for Ringo
In this episode, Ichigo had to redesign her apple birthday cake for Ringo in an hour. How she was able to complete this in an hour is beyond me! I completed my gingerbread house over the course of a few days. These kids must possess incredible skill!

Here's my gingerbread house inspired by the one Ichigo created!

Friday, December 23, 2011

Baking Adventure: Gingy Gingerbread Cookies from Shrek

Merry Christmas-Eve Eve! This Christmas season, I decided to have an Baking Adventure with Gingy Gingerbread Cookies!
Gingy from Shrek
If you're looking for a tutorial on how to make Gingy, you have to check out Diamonds for Dessert's blog. She does such an amazing job! I love her attention to detail! I wouldn't have been able to make these as successfully if it weren't for her helpful tips and detailed guide.

For my Gingys (Gingies?), I used the Thin, Crisp Gingerbread Cookies recipe from Cook's Illustrated and the Sugar Cookie Icing recipe found on allrecipes.com.
Homemade Gingy Gingerbread Cookies
Here are a few helpful notes:
1. I didn't roll out my dough as thin and didn't bake them as long as the recipe stated. As a result, my cookies were more thick and soft than crispy, but I was okay with that.
2. The cookie recipe had too much ginger for me taste. If I use this recipe again, I'm going to cut down on the ground ginger.
3. I also noticed that the Gingys expanded in the oven so when you are forming them, you need to make him skinnier than you want him to be. Then he puffs up into the perfect size. My first batch ended up looking like little marshmallow men. 
4. Finally, instead of using a piping bag for the icing, I used a Food Drawing Pen that I got from Daiso. It was only about $2 and has an exchangeable tip for different widths of writing.
Food Drawing Pen
I was really happy with how my Gingys turned out! My friends and family enjoyed torturing eating them. (Those monsters! Haha!) But seeing them enjoy the food I make is really the best compliment. I hope you all have a warm, sweet, love-filled happy holiday season!

Thursday, December 15, 2011

Baking Adventure: Hagrid's Rock Cakes from Harry Potter

My mom's been requesting oatmeal cookies since my aunt gave us a huge Costco-sized bag of old fashioned oats. After looking around for a good recipe, I decided to just try the Vanishing Oatmeal Raisin Cookies recipe under the lid of the Quaker oatmeal container. Since we didn't have raisins and my parents don't like super sweet cookies, I made a few modifications to the recipe. Well... those modifications resulted in a total oatmeal cookie FAIL! My cookies didn't spread at all! They looked like... well, little rocks! That's when I realized this wasn't a fail... It was a total WIN! I had inadvertently made my own version of Hagrid's Rock Cakes from Harry Potter!!
Hagrid's Rock Cakes from Harry Potter (Cranberry Oatmeal Cookies)
Fortunately, these little gems weren't hard as rock. They were actually rather cakey and scone-like. They reminded me of those healthy cookies you'd find at Whole Foods. Here's the recipe with modifications:

HAGRID'S ROCK CAKES (CRANBERRY OATMEAL COOKIES)
Adapted from Quaker's Vanishing Oatmeal Raisin Cookies
Yield: approx. 57 Tablespoon-sized rock cakes

Ingredients
  • 1/2  cup (1 stick) butter, softened
  • 1/8  cup vegetable oil
  • 1/2  cup firmly packed brown sugar
  • 1/4  cup granulated sugar
  • 2  eggs
  • 1  teaspoon vanilla
  • 1-1/2  cups all-purpose flour
  • 1  teaspoon baking soda
  • 1  teaspoon ground cinnamon
  • 1/4  teaspoon nutmeg
  • 1/2  teaspoon salt
  • 3  cups Quaker® Oats (quick or old fashioned, uncooked)
  • 1  cup craisins (dried cranberries)

Directions

  1. Combine flour, baking soda, cinnamon, nutmeg, and salt in a small bowl and mix well.
  2. In a large bowl, beat butter, oil, and sugars on medium speed of electric mixer until creamy. 
  3. Add eggs and vanilla; beat well. 
  4. Add combined flour mixture; mix well. 
  5. Add oats and craisins; mix well. 
  6. Cover cookie dough with plastic wrap and refrigerate overnight.
    • Note: I refrigerated my cookie dough overnight because I wasn't going to bake it the same day. I think the chilled dough (along with this version using less butter) played a roll in my cookies not spreading, but you might not have to chill the dough. Let me know how they turn out if you did or did not chill them! :)
  7. Heat oven to 350°F. 
  8. Drop dough by rounded tablespoonfuls onto parchment paper-lined cookie sheets.
  9. Bake 8 to 10 minutes or until light golden brown. 
  10. Cool 1 minute on cookie sheets.
  11. Remove to wire rack. 
  12. Cool completely before storing tightly covered. 

Fun Fact: Rock cakes are actual things served during teatime in Britain! They're not just a treat from the magical world of Harry Potter. I've never tried them in real life so I can't compare my version to the traditional British rock cake, but I'm sure you can find authentic recipes online. :)

Tuesday, December 6, 2011

Anime Food Re-creation: Naruto Onigiri (or Riceball)

Hey all! I have another Anime Food Re-creation for you! Today is the Naruto onigiri (or riceball) that Hinata makes for Naruto!
Naruto Onigiri (Riceball)
After seeing this onigiri, I knew I had to try to make it! It's so kawaii~ ^.^
Related Posts Plugin for WordPress, Blogger...